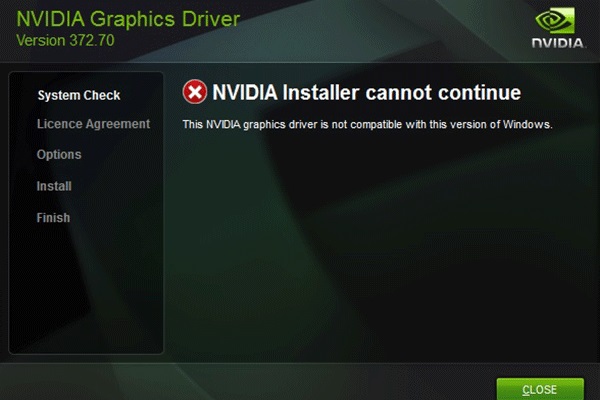
When using Windows 10, the user faces NVIDIA Installer Failed or NVIDIA Installer Cannot Continue error. There are plenty of reasons for this problem, but the major one is the Graphic Card Driver issue.
Graphics Card driver issues occur due to incompatible graphics hardware. Sometimes, the user faded from this annoyance and uninstall NVIDIA to get rid of the NVIDIA Installer cannot continue error.
Therefore, you do not need to worry about it because here we come up with the topmost 5 methods, which certainly help to get rid of this continue installation error. At an initial level, always be assured that the Windows are installed to the latest version.

The struggle between the NVIDIA installer and Windows exists since ancient times. Apart from this, many other things are obstacles in the way of NVIDIA Installation. However, the most significant challenge is finding the exact issue behind the NVIDIA installer failure.
Therefore, scroll down and pick up one method from below mentioned most five methods to fix NVIDIA Installer cannot continue error.
Read Also:
- Unexpected Store Exception
- Antimalware Service Executable
- Ethernet Doesn’t Have A Valid IP Configuration
Contents
Understanding the “NVIDIA Installer Cannot Continue” Error:
The “NVIDIA Installer Cannot Continue” error message appears when users encounter difficulties during the installation or update of NVIDIA graphics drivers on their systems.
This error can manifest in various forms, such as “NVIDIA Installer failed” or “NVIDIA Installer encountered an error,” indicating a failure in the installation process.
Causes of the Error:
Several factors can contribute to the occurrence of the “NVIDIA Installer Cannot Continue” error:
- Corrupted Driver Files: Corrupted or incomplete NVIDIA driver files downloaded from the NVIDIA website or third-party sources can lead to installation failures and trigger the error.
- Driver Compatibility Issues: Incompatible or outdated NVIDIA drivers may not be compatible with the hardware or operating system version, resulting in installation errors.
- Driver Installation Errors: Issues with the driver installation process, such as interrupted installations, conflicting software, or improper installation methods, can cause the NVIDIA installer to fail and display the error message.
- System File Corruption: Corrupted system files or registry entries related to NVIDIA drivers can interfere with the installation process and lead to errors.
How to Fix NVIDIA Installer Cannot Continue Issue
Many solutions are available on the web that solves your installation problem. So don’t panic because your worries are bound to be terminated on the web. There are various solutions applied to unravel the problem successfully.
Kindly look at all the methods explained below and follow them to fix NVIDIA Installer Cannot Continue Issue. After following these methods, I assure you that your NVIDIA Installation continuous error will eliminate.
Method 1: Close NVIDIA Processes
Sometimes we do not know, but some NVIDIA processes are running in the background and resist the installing process. Therefore, Killing the running processes associated with NVIDIA is one of the solutions which will execute to resolve the matter of NVIDIA Installer Cannot Continue Error.
Here are the steps mentioned which you should follow to implement this method and get rid of the NVIDIA Installer Cannot Continue error:
Step 1 – First, Open Start Menu.
Step 2 – Then type Task Manager within the search bar.
Step 3 – Find the NVIDIA process and click on “End Task”. Also, check for Windows 10 100% Disk Usage in Task Manager. You find the fix on our website for this error as well.
Step 4 – Then, Restart the Computer.
Method 2: Disable Antivirus and Firewall
Sometimes the antivirus software restricts the installation of NVIDIA. Thus, We suggest closing all the running firewall and antivirus temporarily. This method is useful for most users, and they give positive replies after implementing this method to resolve their installation problem.
There are plenty of Antivirus and Firewall available, which continues their operation in the background, becoming a barrier in the NVIDIA installation process. We can do this quickly by killing the processes Associated with Antivirus from the Task Manager.
Later on, the installation can carry back again. You should follow the given steps to close all running firewalls and antivirus:
Step 1 – First of all, Press Ctrl + Alt + Delete to open Task Manager.
Step 2 – Navigate below for all the processes associated with Antivirus.
Step 3 – Then Select the target process and End Process.
Step 4 – Then, Restart your system.
Step 5 – At last, Install NVIDIA again.
While killing the background running process, you should know that other running processes apart from Antivirus are essential to run the computer. Therefore, you should be careful while ending those processes.
After following these steps, your problem with NVIDIA Installer Cannot Continue Error will be solved. If you still face NVIDIA Installer Cannot Continue error, then explore following other methods.
Method 3: Add the Device Id of the Graphic Cards manually
Many people forget to add the Device ID of the Graphics Cards because it is automatically set-up. But while installing NVIDIA, you should need to enter manually. You can find Device ID by following the steps and enter it as per the below steps.
The card, at times, detects incorrectly by the system that ends up in the installation failure of NVIDIA. As an answer, the device id can manually enter by the user. The steps to try to so are given below:
Step 1 – Firstly, head to the beginning Menu.
Step 2 – Type board within the Search box and hit Enter.
Step 3 – From the Control Panel items displayed; Search for Device Manager.
Step 4 – Later on, Locate the Display adapters below and expand the option.
Step 5 – Then, Right Click on your NVIDIA Graphic Card.
Step 6 – Select Properties.
Step 7- From the Properties Window, select the Details Tab.
Step 8 – Then select Hardware Ids from the drop-down menu under the Property label.
Step 9 – The Id exists in the form of
PCI\VEN_10DE&DEV_0FD1&SUBSYS_05781828&REV_A2\4&274689E5&0&0108 where VEN stands for Vendor-Id (10DE), and DEV stands for Device Id (0FD)
Step 10 – Visit the website www.pcidatabase.com. Enter the obtained Vendor Id and Device Id.
Step 11 – Then Click on the Search button.
Step 12 – Now, you will get the device name and the vendor name (NVIDIA).
Step 13 – Finally, Install and Update the NVIDIA Driver to the latest version.
Method 4: Delete the Files You Don’t Use
It is necessary to get rid of all redundant files while installing NVIDIA, as sometimes it affects the installation process of NVIDIA. Removal of redundant files to unravel the installation failure error of the system. Here are the files that you should remove:
C:\Windows\System32\DriverStore\FileRepository\nvdsp.inf file
C:\Windows\System32\DriverStore\FileRepository\nv_lh file
C:\Windows\System32\DriverStore\FileRepository\nvoclock file
C:\Program Files\NVIDIA Corporation\
C:\Program Files (x86)\NVIDIA Corporation\
Method 5: Update Drivers and Enable Graphic Cards
In this list, we have to update our drivers, which plays a significant role in the continuous error of NVIDIA Installation. Moreover, We also have to enable the Graphics card as they may be part of the problem.
The drivers are always needed to be updated on time as per the requirement of the situation. Here are a few simple steps that ought to be followed to update the drivers manually.
Step 1 – First, open the Start Menu.
Step 2 – Then, type the Control Panel in Search Bar and open it.
Step 3 – Find the Device Manager option from the items listed in Control Panel.
Step 4 – Then Double Click thereon to open.
Step 5 – Locate Display adapters below and expand the choice. Also, check for any Display Driver Stopped Responding to notification or error.
Step 6 – Then, Right Click on your NVIDIA Graphic Card and Enable it.
Step 7 – After that, Again Right Click on NVIDIA Graphic Card and Select Update Driver Software.
Step 8 – Later, Select the option Search Automatically for updated driver software.
Step 9 – Follow the instructions as displayed on the screen.
Step 10 – Finish the process.
Step 11 – After that, Check if the fix to NVIDIA Installer Failed Windows 7 Error is applied. If not, then repeat Steps 1 -7. Also, check for errors like NVIDIA Installer Cannot Continue.
Step 12 – Click on Update Driver Software but choose to Browse my computer for the driver software option on the screen prompted this time.
Step 13 – After that, Choose Let me pick from a list of device drivers on my computer.
Step 14 – At the moment, browse the compatible driver from your system.
Step 15 – Then Click Next.
Step 16 – After the end of the process, apply the changes you made.
Step 17 – At last, Restart your computer system and see if you affix it. If not, then there may well be the NVIDIA Driver Crashing in Windows 10 error in your system still.
If still a problem occurs, then explore the below-stated methods, which will certainly aid you in solving your NVIDIA error.
Frequently Asked Questions (FAQ) about the “NVIDIA Installer Cannot Continue” Error:
Read Also:
Final Thoughts
In the end, I hope the readers can fix the matter of NVIDIA Installer Cannot Continue Error or NVIDIA Driver Not Installing. Out of all tries made, if you’re still facing the matter, then there is no other choice, and you should have to reinstall Windows 10 again.
Now, remember to stay the backup of the essential files. To a higher alternative, download and install a software name Driver Easy. Also, it’ll scan the error on your system and suggest updating various required errors that may exhibit the installation.
Here mentioned all methods would help you to solve the installation error of NVIDIA Installer. You should follow all the methods step by step because while you are making changes in the control panel, it will affect your computer system.
Therefore you should follow guidelines as mentioned in this article. However, after using all the methods, if you cannot install NVIDIA, you can contact us through our contact us form and find out your solution.


