
Belkin Router Login, IP, Username and Password: Imagine a day without the internet! Un-imaginable, right? The Internet connects each other and keeps us updated about the other corner of the world.
Routers and modems have always been undoubtedly the most important commodity in our daily lives. Nowadays all the organizations, families, students want wireless routers in their offices and homes. To get a hassle-free experience of fast WiFi we all deserve the best router in the market.
And Belkin Router always proves to be the savior by being the fastest wireless router. Although the set-up can be done in a jiffy but on the other hand can also be a little tricky at times. Instead of going to the administration panel, let us look at the set-up procedure here Step by Step.
Read Also:
Contents
Belkin Router Login, IP, Username and Password
1. Turn on the Router
Step 1: Go ahead and unplug the modem or router from any power source.
Step 2: Connect the Ethernet cable to the WAN from the modem or internet port of the router.
Step 3: Power ON the modem first, then power ON the router by plugging them back to the Power Source.
2. Router Manual Set-Up
The steps mentioned below might not apply for some Belkin Routers. Although you can refer to the steps given below for the first-time configuration.
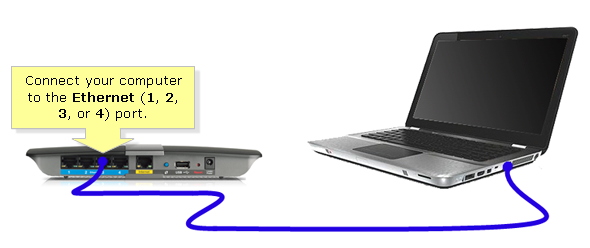
Step 1: First of all, connect the desktop to any port preferably Ethernet Port (1) of the router.
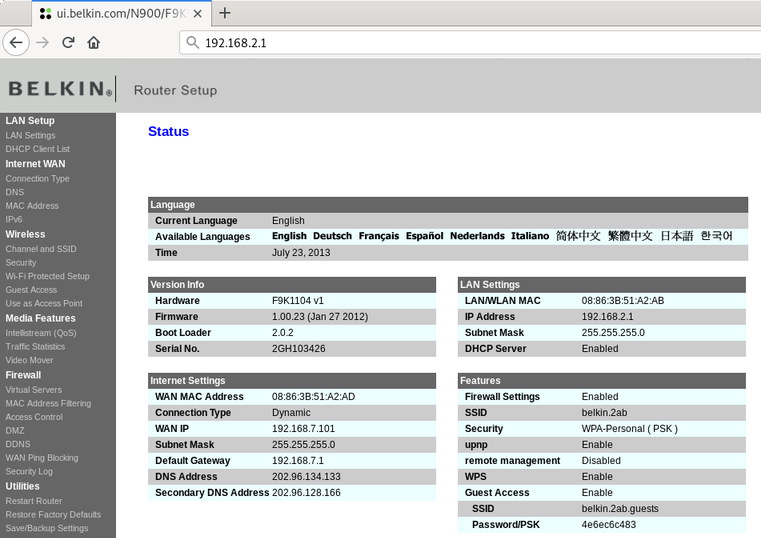
Step 2: Secondly, launch a web browser and enter the default IP Address in the address bar and click ENTER.
Note: The default IP Address of a Belkin Router is 192.168.2.1.
Step 3: Then, press LOGIN.
Step 4: Next, leave the password space blank and click on SUBMIT.
Step 5: After that, under INTERNET WAN click CONNECTION TYPE.
Step 6: Now, select what kind of CONNECTION TYPE you want. As shown below we have selected DYNAMIC (This is a more common type of connection.)
Step 7: Click NEXT.
Note: If you are not aware of your Connection Type, please connect with your ISP (INTERNET SERVICE PROVIDER).
Step 8: Lastly, enter the details provided by your ISP and click on APPLY CHANGES key.

You should now be connected to the internet. You can verify by checking the status which should show CONNECTED on the top right-hand side corner.
More IP Login Guides:
- 192.168.0.3 IP Admin Login and Router Settings Guide
- 192.168.254.254 Admin Login, User, Password and IP
- 10.0.0.2 IP Admin Login, Username, Password
- 192.168.11.1 IP Admin Login, Username, Password
3. Set Up Wireless Feature on Belkin Router
To configure the setup page, click on the wireless TAB. You can further go ahead and change the settings as shown below. Likewise, you can change the wireless network name and wireless channel.
4. Enable Wireless Security
At last, go ahead and select the SECURITY option under the WIRELESS tab. Henceforth, keep following the Steps provided below.
Also Read:
- Xfinity Router Login, IP, Username and Password
- NETGEAR Router Login, IP, Username and Password
- 192.168.0.254 IP Admin Login and Router Settings
- 192.168.1.100 Admin Login, Username And Password
Conclusion
Undoubtedly, the Belkin Router is completely set-up now. You can check the internet connection by opening your favorite website. If still facing issues with the connection, please feel free to check out the Belkin Router Site for more information and support to connect more devices.
You can increase the security of your wireless connection by combining various security methods on your router. By doing this you will be guaranteed a secured and optimized wireless security configuration.


